1 Giới thiệu về Raspberry pi
1.1 Raspberry Pi là gì? và xuất xứ? Tại sao lại chọn Raspberry Pi?
1.1.1 Raspberry Pi là gì ?
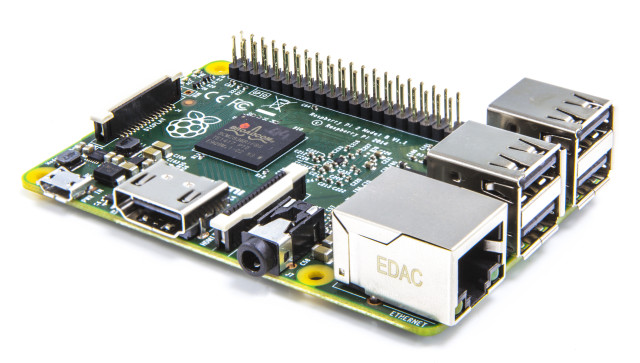
- Raspberry Pi ban đầu là một thẻ card được cắm trên bo mạch máy tính được phát triển bởi các nhà phát triển ở Anh. Sau đó Raspberry Pi đã được phát triển thành một bo mạch đơn có chức năng như một máy tính mini dùng để giảng dạy trong môn khoa học máy tính ở các trường trung học.
- Raspberry Pi Foundation– là tổ chức phi lợi nhuận với tiêu chí xây dựng hệ thống mà nhiều người có thể sử dụng được trong những công việc tùy biến khác nhau.
1.1.1 Xuất xứ
- Được phát triển tại Anh.
- Raspberry Pi được phát triển đầu tiên vào năm 2012 .
1.1.2 Tại sao lại chọn Raspberry Pi?
- Thiết kế nhỏ gọn.
- Chức năng như một máy tính có các kết nối HDMI, Video.
- Có thêm các GPIO đầy đủ như một vi điều khiển thông thường để người phát triển có thể sử dụng như:
- GPIO : các chân Input , Output bình thường.
- Module I2C, SPI, UART, PWM.
- Nguồn đầu ra với hiệu điện thế thông dụng: 5V và 3.3V
- Cộng đồng người sử dụng trên toàn thế giới.
- Chạy hệ điều hành dựa trên nhân linux.
- Hệ điều hành được phân phối miễn phí.
- Giá thành rẻ.
1.1.3 Các phiên bản của Raspberry Pi
Model A, Model A+, Model B, Model B+,Model B thế hệ thứ 2(Raspberry Pi 2).
1.2 Cấu hình phiên bản Raspberry Pi B+
- CPU: Lõi tứ ARM Cortex A7, tốc độ 900MHz
- GPU: Broadcom VideoCore IV – 250MHz
- Bộ nhớ RAM: 1GB, tuy nhiên bị chia sẻ 250MHz cho GPU
- Cổng USB: 4
- Video output: HDMI, composite video thông qua jack 3,5 mm
- Audio outputs: Analog qua jack 3,5 mm; kỹ thuật số thông qua cổng HDM
- Bộ nhớ trong: thẻ nhớ microSD
- Kết nối mạng: Ethernet 10/100Mbps
- Nguồn điện: 5 V qua MicroUSB hoặc GPIO
- Kích thước: 85.60mm × 56.5mm
- Trọng lượng: 45g
1.3 Các kết nối với Raspberry Pi 3
.png)
GPIO
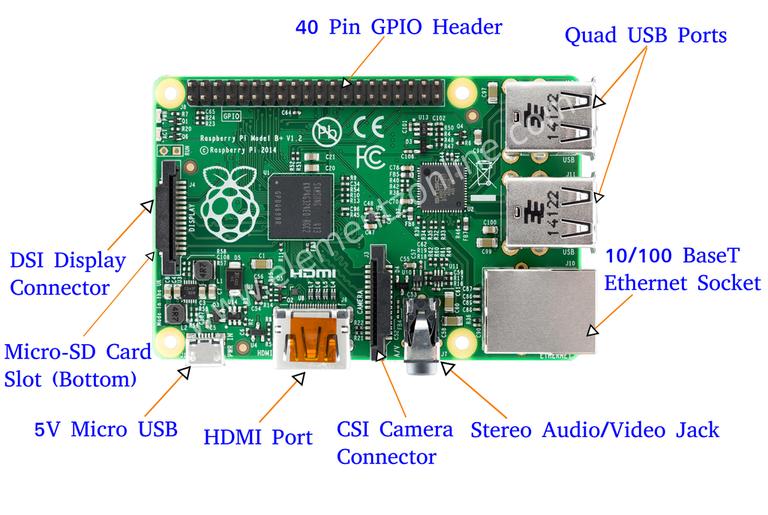
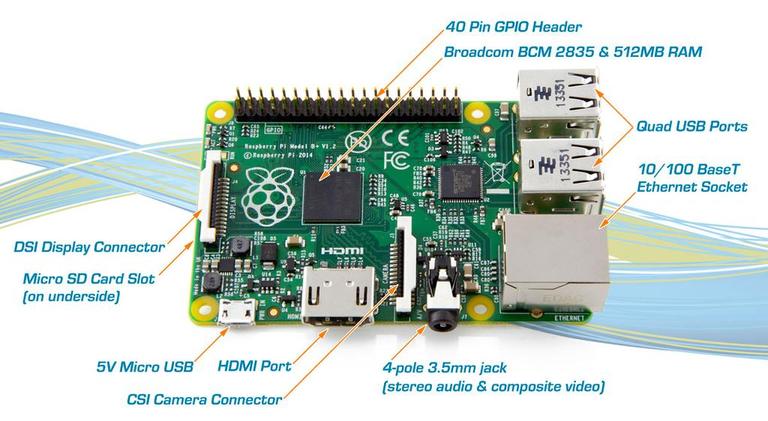
Các cổng kết nối trên raspberry pi 3
- Ethernet: Cổng mạng Ethernet 10/100M
- Video: HDMI hỗ trợ phiên bản 1.3/1.4 và Composite RCA (PAL and NTSC)
- Audio: Cổng ra 3.5 và HDMI
- USB: 4 cổng USB 2.0
- GPIO: 40 chân
- Camera: Connector 15-pin MIPI Camera Serial Interface (CSI-2)
- Display: Connector Display Serial Interface (DSI)
- Memory Card Slot: MicroSD
1.4 Những ứng dụng thông dụng của Raspberry Pi
- Giảng dạy trong môn khoa học máy tính ở các trường trung học, cao đẳng và đại học.
- Dành cho các nhà phát triển như truyền dữ liệu, điều khiển, …
- Cài đặt xbmc để biến thành một thiết bị “Smartbox TV” xem phim internet cũng có chức năng như một đầu kỹ thuật số hiện đại bây giờ.
1.5 Những thiết bị đi kèm cần thiết.
- Bộ nguồn 5V , 2A.
- Chuột đầu cắm USB.
- Bàn phím đầu cắm USB.
- Dây HDMI và một màn hình.
1.6 Các ngôn ngữ lập trình trên Raspberry
2 Ứng dụng Demo
Mình sẽ trình bày ứng dụng “Security Camera System”
2.1 Các chức năng của ứng dụng:
- Khi có người chuyển động thì tự động chụp liên tiếp 10 hình, mỗi hình cách nhau 1 giây rồi gửi cảnh báo về mobile.
- Mobile có thể xem được lịch sử tất cả các cảnh báo.
- Chụp hình tại thời điểm hiện tại.
- Xem video live stream.
2.2 Các phụ tùng và kỹ thuật sử dụng
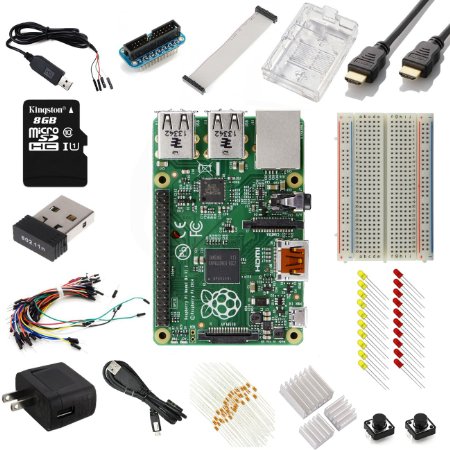
Phụ tùng gồm:
- 1 Raspberry pi 3
- 1 Camera của raspberry
- 1 Cảm biến chuyển động
- Dây điện
- Đèn led
- 2 Điện trở 320 ôm.
- 1 breadboard
Kỹ thuật:
- Raspberry: dùng node js để nhận tín hiệu vào, xử lý tín hiệu ra và giao tiếp với server AWS IoT và Server socket cho live video.
- Server: dùng node js để viết web socket
- Server stream: dùng node js, hiện tại dùng source trên mạng
- Mobile: iOS (objective c) và giao tiếp với server thông qua api, socket
2.3 Các luồng xử lý
2.3.1 Chức năng cảnh báo
.png)
- Bước 1: Khi có chuyển động thì raspberry sẽ nhận tín hiệu từ cảm biến và chụp liên tiếp 10 hình, mỗi hình cách nhau 1s và lưu dưới local.
Hiểu rõ hơn cách làm việc của sensor xem tại đây
var Gpio = require('onoff').Gpio
led = new Gpio(18,'out') //gắn tín hiệu ra của led ở chân 18 raspberry
pir = new Gpio(22,'in','both') //gắn tín hiệu vào của cảm biến ở chân 22 của raspberry
pir.watch(function(err,value){
if(err) {exit();}
if (value == 1) {
//đèn nháy để cho biết có chuyển động
iv = setInterval(function(){
led.writeSync(led.readSync() === 0 ? 1 : 0)
}, 100);
//chụp hình và gửi cảnh báo về client
server.sendWarning(function(finish){
exit();
});
}else{
exit();
}
})
- Bước 2: Tạo warningId là currentTime và publish đến server AWS IoT
Để sử dụng AWS IoT và kết nối từ raspberry đến AWS IoT bạn tham khảo ở đây.
Để kết nối từ raspberry đến AWS IoT bằng node js bạn tham khảo ở đây.
var idWarning = Date.now();
- Bước 3: Insert IdWarning và createTime đến AWS DymanoDB thông qua AWS IoT
Bạn tham khảo cách tạo rule trong AWS IoT để insert dữ liệu đến AWS DymanoDB tại đây.
- Bước 4: Upload hình ảnh dưới local đến AWS S3.
var AWS = require('aws-sdk');
AWS.config.update({accessKeyId: 'AKIAJQRS64LGGMRJWMEQ', secretAccessKey: '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'});
AWS.config.update({region: 'us-west-2'});
var s3 = new AWS.S3();
var path = require('path');
var params = {Bucket: 'warningimages',ACL:'public-read', Key: path.basename(filePath), Body: fs.createReadStream(filePath)};
s3.upload(params, function(err, data) {
if (err == null) {
//xoa file client
deleteFile(filePath);
}else{
console.log(err);
}
});
Bạn tham khảo các sử dụng AWS S3 tại đây.
- Bước 5, 6, 7: Sau khi upload image đến AWS S3 thành công thì trả về link image và publish link image kèm với idWarning đến AWS IoT để insert vào bảng warningImages của AWS DymanoDB.
s3.upload(params, function(err, data) {
if (err == null) {
socket.publish('topic_add_new_image',JSON.stringify({idWarning:idWarning,link:data.Location}))
console.log(data.Location);
//xoa file client
deleteFile(filePath);
}else{
console.log(err);
}
callback();
});
- Bước 8, 9: Push notification đến AWS SNS để push về mobile.
AWS.config.update({accessKeyId: 'AKIAJQRS64LGGMRJWMEQ', secretAccessKey: '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'});
AWS.config.update({region: 'us-west-2'});
var sns = new AWS.SNS();
var message = {"default":"This is the default Message",
"APNS": "{\"aps\":{\"alert\": \"Detect a movement, please check\",\"badge\" : 0,\"sound\" :\"default\"} }",
"APNS_SANDBOX": "{\"aps\":{\"alert\": \"Detect a movement, please check\",\"badge\" : 0,\"sound\" :\"default\"} }"}
var params = {
Message: JSON.stringify(message), /* required */
MessageStructure: 'json',
TopicArn: 'arn:aws:sns:us-west-2:164713940671:topic_apns' /* required */
};
sns.publish(params, function(err, data) {
if (err) console.log(err, err.stack); // an error occurred
else console.log(data); // successful response
});
2.3.2 Chức năng chụp hình
.png)
- Bước 1, 2: Mobile publish yêu cầu chụp hình đến AWS IoT và AWS IoT sẽ republish đến Raspberry.
Tham khảo cách kết nối đến và sử dụng các service của amazon tại đây.
- Bước 3, 4: Raspberry chụp hình rồi upload đến AWS S3 và lấy được link hình ảnh.
- Bước 5, 6: Raspberry publish link hình ảnh đến AWS IoT và AWS IoT sẽ republish đến mobile.
2.3.3 Chức năng live video.
.png)
- Bước 1, 2: Mobile emit yêu cầu live video đến Server socket, và Server socket sẽ emit đến Raspberry.
- Bước 3: Raspberry start camera và stream video đến Stream Server
var exec = require('child_process').exec;
var stream_url = 'rtsp://dev.co-mit.com:9090/livevideo';
var cmd = 'raspivid -o - -t 0 -w 640 -h 480 -fps 25 -b 600000 -g 50 | ffmpeg -analyzeduration 10 -re -ar 44100 -ac 2 -acodec pcm_s16le -f s16le -ac 2 -i /dev/zero -f h264 -i - -vcodec copy -acodec aac -ab 128k -g 50 -strict experimental -f rtsp -rtsp_transport tcp '+stream_url;
process = exec(cmd);
- Bước 4, 5: Raspberry emit stream_url = 'rtsp://dev.co-mit.com:9090/livevideo' đến Server Socket để truyền về cho mobile.
Mobile dùng thư viện DFVideoPlayer để play stream video.
2.3.4 Chức năng xem lịch sử cảnh bảo
- Mobile kết nối đển AWS DymanoDB để query danh sách các cảnh bảo
AWSDynamoDBObjectMapper *dynamoDBObjectMapper = [AWSDynamoDBObjectMapper defaultDynamoDBObjectMapper];
AWSDynamoDBScanExpression *scanExpression = [AWSDynamoDBScanExpression new];
[[dynamoDBObjectMapper scan:[WarningList class]
expression:scanExpression]
continueWithBlock:^id(AWSTask *task) {
if (task.error) {
NSLog(@"The request failed. Error: [%@]", task.error);
fail(task.error);
}else if (task.exception) {
NSLog(@"The request failed. Exception: [%@]", task.exception);
fail(nil);
}else if (task.result) {
NSMutableArray *warningList = [[NSMutableArray alloc]init];
WarningResponse *response;
AWSDynamoDBPaginatedOutput *paginatedOutput = task.result;
NSDateFormatter *df = [[NSDateFormatter alloc]init];
[df setDateFormat:@"HH:mm:ss dd-MM-yyyy"];
for (WarningList *warning in paginatedOutput.items) {
response = [[WarningResponse alloc]init];
response.idWarning = warning.idWarning;
NSDate *date = [NSDate dateWithTimeIntervalSince1970:[warning.warningTime floatValue]/1000];
response.warningTime = [df stringFromDate:date];
[warningList addObject:response];
}
NSSortDescriptor *sortDescriptor;
sortDescriptor = [[NSSortDescriptor alloc] initWithKey:@"idWarning"
ascending:NO];
NSArray *sortDescriptors = [NSArray arrayWithObject:sortDescriptor];
warningList = [[warningList sortedArrayUsingDescriptors:sortDescriptors] mutableCopy];
WarningListResponse *responseList = [[WarningListResponse alloc]init];
responseList.message_code = SUCCESS_CODE;
responseList.data = warningList;
}
}];
- Khi click vào warning trong danh sách các warning thì query các image của warning đó trên AWS DymanoDB.
AWSDynamoDBObjectMapper *dynamoDBObjectMapper = [AWSDynamoDBObjectMapper defaultDynamoDBObjectMapper];
AWSDynamoDBScanExpression *scanExpression = [AWSDynamoDBScanExpression new];
scanExpression.filterExpression = @"idWarning = :val";
scanExpression.expressionAttributeValues = @{@":val":idWarning};
[[dynamoDBObjectMapper scan:[warningImages class]
expression:scanExpression]
continueWithBlock:^id(AWSTask *task) {
if (task.error) {
NSLog(@"The request failed. Error: [%@]", task.error);
fail(task.error);
}else if (task.exception) {
NSLog(@"The request failed. Exception: [%@]", task.exception);
fail(nil);
}else if (task.result) {
NSMutableArray *warningList = [[NSMutableArray alloc]init];
ImageResponse *response;
AWSDynamoDBPaginatedOutput *paginatedOutput = task.result;
int idImage = 0;
for (warningImages *image in paginatedOutput.items) {
response = [[ImageResponse alloc]init];
response.idWarning = image.idWarning;
response.link = image.link;
response.idImage = [NSString stringWithFormat:@"%d",idImage];
[warningList addObject:response];
idImage++;
}
ImageListResponse *responseList = [[ImageListResponse alloc]init];
responseList.message_code = SUCCESS_CODE;
responseList.data = warningList;
}
}];
Bạn tham khảo thêm cách sử dụng AWS DymanoDB cho Objective C tại đây
Leave a Comment