Pre-processing
Bản thân css nói một cách nôm na là dạng nguyên thuỷ, chỉnh sửa màu sắc, cỡ chữ,.. của 1 component một cách trực tiếp.
Điều đó tốt, tuy nhiên khi dự án được phinh to mở rộng ra, các chức năng phức tạp xuất hiện thì lúc này vấn đề quan trọng chính là làm sao để dễ 'maintance' các style của các component khi mà các style được định nghĩa trực tiếp trong mỗi view, dẫn đến tình trạng lặp lại và khó maintaince.
Pre-Processing: Tiền xử lý hay còn gọi là sơ chế.
Định nghĩa này được sử dụng trong cụm từ pre-processing css và tại sao là pre-processing css.
Sơ chế: có nghĩa bạn có thể làm các phép tính, biến đổi nó trước khi cho ra 1 style css.
Pre-Processing với các tính năng như định nghĩa các biến, extend, condition statement, loop,... sẽ giúp chúng ta giảm thiểu số lượng code bởi chúng ta có thể tái sử dụng, kế thừa,... trong css.
Hay nói cách khác việc sử dụng pre-processing giúp tăng hiệu suất sản phẩm, giảm số lượng dòng code, maintance dễ dàng hơn.
Và chúng ta có nhiều lựa chọn cho pre-processing như là: SASS, LESS, STYLUS
Sass
Các bạn có thể tìm hiểu kỹ hơn về sass tại http://sass-lang.com/
Tích hợp Sass và yii2 framework
Init project với yii2
composer create-project --prefer-dist yiisoft/yii2-app-basic yii2-scss
Install yii2-asset-converter
Thêm
"nizsheanez/yii2-asset-converter": "1.*",
Chạy lệnh composer update
Config assetManager tại config/web.php
'assetManager' => [
    'converter' => [
        'class' => 'nizsheanez\assetConverter\Converter',
        'force'=> true,
        'parsers' => [
            'scss' => [ // file extension to parse
                'class' => 'nizsheanez\assetConverter\Scss',
                'output' => 'css', // parsed output file type,
                'options' => [ // optional options
                    'enableCompass' => true, // default is true
                    'importPaths' => [
                        '@webroot/css',
                    ], // import paths, you may use path alias here,
                    // e.g., `['@path/to/dir', '@path/to/dir1', ...]`
                    'lineComments' => false, // if true — compiler will place line numbers in your compiled output
                    'outputStyle' => 'expanded', // May be `compressed`, `crunched`, `expanded` or `nested`,
                    // see more at http://sass-lang.com/documentation/file.SASS_REFERENCE.html#output_style
                ],
            ],
        ]
    ],
],
Tạo file app.scss tại web/css và thêm code dưới đây để test
$color-primary: orange !default;
$color-light: #f5f7f7;
$color-dark: #202124;

.btn-primary-test {
  background: $color-primary;
  color: $color-light;
}
AppAsset
Chỉnh sửa config load asset css thành
public $css = [
    'css/app.scss',
];
File view
Chỉnh sửa file view để test với style vừa tạo tại app.scss
<div class="jumbotron">
    <h1>Congratulations!</h1>
    <p class="lead">You have successfully created your Yii-powered application.</p>

    <p><a class="btn btn-lg btn-primary-test" href="http://www.yiiframework.com">Get started with Yii</a></p>
</div>
Bây giờ vào browser reload lại page index chúng ta sẽ được như sau
 Bây giờ có thể để ý rằng trong source sẽ tự động sinh ra file web/compiled/css/app.css
Config mẫu
Bây giờ tôi sẽ sử dụng các tính năng của pre-processor trong sass để config cơ bản style cho project
Tất cả các style sẽ được chưa trong app.scss và được biên dịch ra 1 file duy nhất là app.css
Cấu trúc thư mục trong css
--css
----app.scss
----_basics.scss
----_config.scss
----_functions.scss
----_mixins.scss
----_setup.scss
app.scss
Nơi bạn có thể import font, icon framework như fontawesome hoặc ionic và tất cả file còn lại trong thư mục css
_basics.scss
Nơi định nghĩa của style cơ bản hay dùng, ví dụ:
@for $k from 0 through 9 {
    $value: ($k+1)*100;
    .h-#{$value} {
        height: #{$value}px;
    }
}
Chỉ với vài dòng này khi reload page chương trình sẽ biên dịch ra file app.css như sau:
.h-100 {
  height: 100px;
}
.h-200 {
  height: 200px;
}
.h-300 {
  height: 300px;
}
.h-400 {
  height: 400px;
}
.h-500 {
  height: 500px;
}
.h-600 {
  height: 600px;
}
.h-700 {
  height: 700px;
}
.h-800 {
  height: 800px;
}
.h-900 {
  height: 900px;
}
.h-1000 {
  height: 1000px;
}
Tiết kiệm khá nhiều thời gian và dễ dùng
_config.scss
Nơi định nghĩa các biến sẽ dùng. Ví dụ:
// Fonts
// -----------------------------------------

$font-primary: 'Montserrat', sans-serif !default;
$font-secondary: 'Montserrat', sans-serif !default;

// Colors
// -----------------------------------------

$bg-color: darken( white, 6% );       //  6% gray
$bg-color-alt: darken( white, 24% );  // 24% gray
_functions.scss
Nơi định nghĩa các hàm sẽ dùng trong sass. Ví dụ:
/// Slightly lighten a color
/// @access public
/// @param {Color} $color - color to tint
/// @param {Number} $percentage - percentage of `$color` in returned color
/// @return {Color}
@function tint($color, $percentage) {
  @return mix(white, $color, $percentage);
}

/// Slightly darken a color
/// @access public
/// @param {Color} $color - color to shade
/// @param {Number} $percentage - percentage of `$color` in returned color
/// @return {Color}
@function shade($color, $percentage) {
  @return mix(black, $color, $percentage);
}
_mixins.scss
Để styles có thể chạy được trên nhiều browser khác nhau bạn cần phải định nghĩa thêm các prefix cho nó, ví dụ
.round {
    /* Safari 3-4, iOS 1-3.2, Android 1.6- */
    -webkit-border-radius: 12px;

    /* Firefox 1-3.6 */
    -moz-border-radius: 12px;

    /* Opera 10.5, IE 9, Safari 5, Chrome, Firefox 4, iOS 4, Android 2.1+ */
    border-radius: 12px;
}
Và mỗi lần muốn dùng thuộc tính border-radius bạn phải khai báo nhiều prefix như vậy khá tốn thời gian.
Sass hỗ trợ nó bằng mixin như sau:
@mixin border-radius($radius) {
    -webkit-border-radius: $radius;
    -moz-border-radius: $radius;
    -ms-border-radius: $radius;
    border-radius: $radius;
}
Và giờ muốn dùng chỉ cẩn @include
.round { @include border-radius(10px); }
_setup.scss
Nơi định nghĩa cho các tag cơ bản của project như các thẻ html, a, input,... Ví dụ:
html {
    font-size: 14px;

    @media #{$screen-xs} {
        font-size: 13px;
    }
}

body {
    position: relative;
    color: $color-primary;
    background-color: $bg-color;
    font-family: $font-primary;
    font-weight: 300;
    line-height: 1.8;
    overflow-x: hidden;
    -webkit-font-smoothing: antialiased;
    -moz-osx-font-smoothing: grayscale;
}
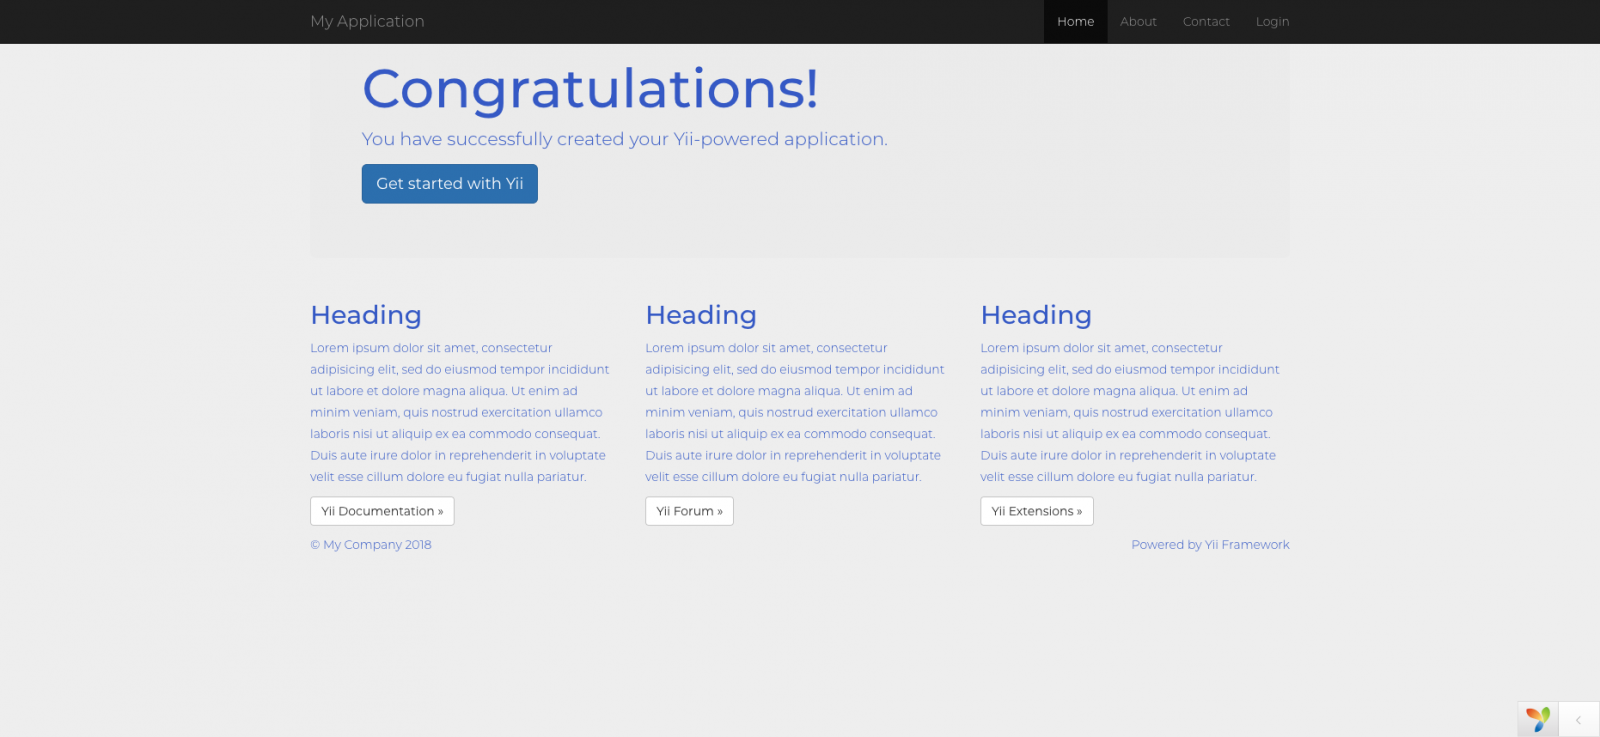
Sau khi config tất cả theo style riêng, tôi sẽ được 1 trang thế này đây.

Tham khảo:
- https://htmlmag.com/article/an-introduction-to-css-preprocessors-sass-less-stylus
- http://www.yiiframework.com/doc-2.0/guide-start-installation.html
Source code: https://github.com/Tuan-T-Nguyen/yii-sass

Leave a Comment