I.Giới thiệu về Swagger
Swagger là một công cụ đơn giản nhưng mạnh mẽ để tạo document cho các dự án sử dụng RESTful API. Với hàng ngàn developer tham gia hỗ trợ phát triển Swagger ở hầu hết các ngôn ngữ lập trình và các môi trường deloy.
Phiên bản mới nhất hiện tại là 2.0. wagger 100% open source.
![]()
II.Tạo RESTful API với YII 2
Trong bài này mình chỉ sử dụng Yii2 basic.
1.Tạo database
Các bạn thay đổi config db ở file cofig/db.php sao cho phù hợp.
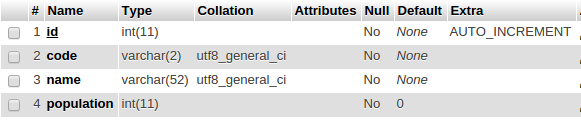
Ở đây mình chỉ tạo bảng country bao gồm các thuộc tính như ảnh dưới:
Các bạn có thể sử dụng migrate để tạo bảng trên.
2.Tạo model
Sử dụng gii(vào link http://localhost/yii2-swagger/web/gii/model) để tạo model
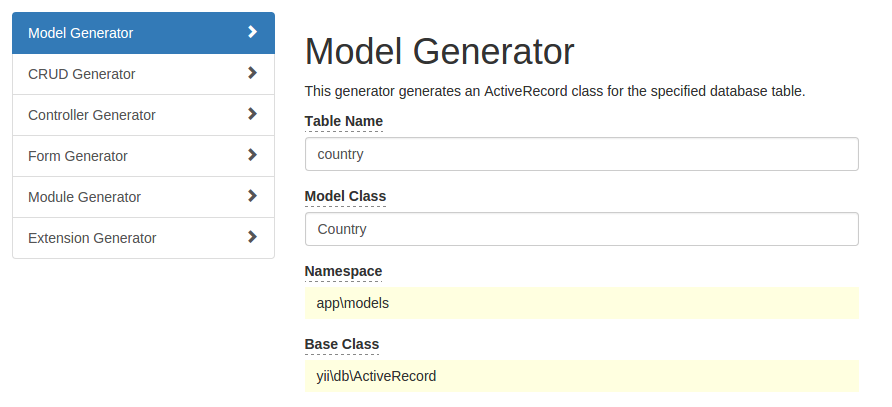
Sau khi tạo xong ta sẽ có file Country trong folder models với nội dung như sau:
class Country extends ActiveRecord {
/**
* @inheritdoc
*/
public static function tableName() {
return 'country';
}
/**
* Define rules for validation
*/
public function rules() {
return [
[['code', 'name', 'population'], 'required'],
[['population'], 'integer'],
[['code'], 'unique'],
[['code'], 'string', 'length' => 2],
[['name'], 'string', 'max' => 52],
];
}
}
Note: mình cũng đã custom lại trường code chỉ nhập ký tự.
3.Tạo model api
Tạo model api(ở link http://localhost/yii2-swagger/web/gii/module) với tên như hình dưới:
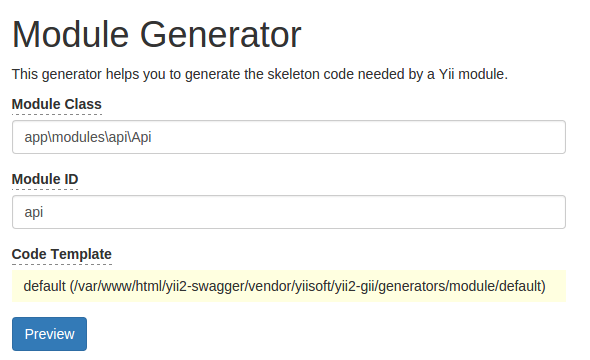
Note: Nếu dùng trên linux phải cấp quyền đọc, ghi cho folder modules.
Sau khi tạo xong bạn add module api vào trong file config/web.php:
'modules' => [
'api' => [
'class' => 'app\modules\api\Api',
],
],
4.Tạo Api cho model country
Hiện tại thì YII2 đã hỗ trợ RESTful khá tốt. Bạn không cần phải tự viết như hồi YII1.
Bạn tạo controller kế thừa ActiveController của rest và tham chiếu tới model Country như nội dung:
namespace app\modules\api\controllers;
use yii\rest\ActiveController;
/**
* Country Controller API
*
* @author Thanh Le<thanhle09t2bkdn@gmail.com>
*/
class CountryController extends ActiveController
{
public $modelClass = 'app\models\Country';
}
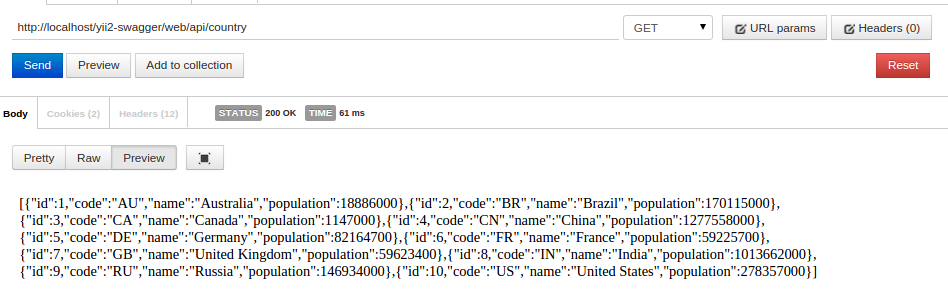
Sau khi tạo xong thì bạn đã có thể sử dụng một số action đặc trưng (index, view, update, create, delete) theo chuẩn RESTful như hình:
Action index(method GET)
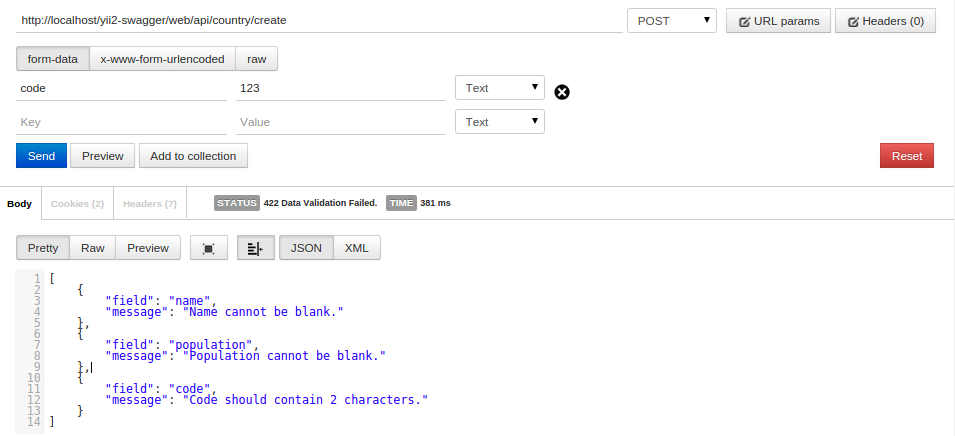
Action create(method POST)
Note: Ngoài ra bạn cũng có thể tự tạo các action riêng, sử dụng access token. Các bạn tham khảo ở link.
III.Sử dụng Swagger
1.Config Swagger
Để sử dụng được Swagger cho YII2 bạn phải add thêm thự viên "zircote/swagger-php": "^2.0"(thư viện này dùng để build file swagger.json để sử dụng làm document) trong file composer.json.
- Bạn tạo thêm thư mục swagger trong folder web để chứa dữ liệu swagger. Trong folder swagger chứ các folder con: swagger-api(chứa file tự định nghĩa sử dụng Annotations), swagger-docs(chứa file swagger.json sau khi build file ở swagger-api), swagger-ui(là thư viện để view thông tin file swagger.json) bạn tải nó ở đây https://github.com/swagger-api/swagger-ui.
2.Viết document for action index của model Country
Tạo file index.php với nội dung:
use Swagger\Annotations as SWG;
/**
* @SWG\Info(title="My First API", version="0.1")
*/
/**
* @SWG\Swagger(
* schemes={"http"},
* host="localhost/yii2-swagger/web",
* basePath="/api",
* )
*/
/**
* @SWG\Get(
* path="/country",
* summary="list countries",
* @SWG\Response(
* response=200,
* description="A list with countries"
* ),
* @SWG\Response(
* response="default",
* description="an ""unexpected"" error"
* )
* )
*/
Nội dụng file cũng khá dễ hiểu nên mình không cần giả thích thêm.
Sau khi tạo file đã xong bạn mở terminal lên và chạy lệnh:
vendor/zircote/swagger-php/bin/swagger web/swagger/swagger-api -o web/swagger/swagger-docs
Câu lệnh trên đơn giản là dùng swagger để đọc file index.php trong swagger-api rồi build file swagger.json trong swagger-docs.
Để cho tiện hơn các bạn có thể tạo file và chạy lệnh trên bằng sh.
Sau khi build thành công thì ta có file swagger.json với nội dung:
{
"swagger": "2.0",
"info": {
"title": "My First API",
"version": "0.1"
},
"host": "localhost/yii2-swagger/web",
"basePath": "/api",
"schemes": [
"http"
],
"paths": {
"/country": {
"get": {
"summary": "list countries",
"responses": {
"200": {
"description": "A list with countries"
},
"default": {
"description": "an \"unexpected\" error"
}
}
}
}
},
"definitions": {
}
}
Các bạn tham khảo link http://zircote.com/swagger-php/annotations.html#responsemessage để tạo các tương tác với các action khác.
3.Sử dụng swagger-ui
Để cho trực quan chúng ta sử dụng thư viện swagger-ui để view swagger.json.
Bạn vào folder swagger-ui/dist/index replace đường link http://petstore.swagger.io/v2/swagger.json với link http://localhost/yii2-swagger/web/swagger/swagger-docs/swagger.json.
Bạn mở đường link http://localhost/yii2-swagger/web/swagger/swagger-ui/dist/ nó sẽ load file swagger.json view document rất trực quan.

Các bạn có thể xem kết quả tại đây.
Và các bạn có thể tải source tham khảo tại đây.
Leave a Comment